My photo
Oh, the lame yet slightly interesting musings of a foreign teenager. Strange, quirky, (attempts to be) kind, and nerd in denial, Patricia [if not doing school work, playing the guitar/video games, or making crafts] enjoys writing about herself in flattering third person. If you would like a free pattern for any crochet piece, have a question, comment, snark remark, suggestion, opinion, fact, or such, please leave a comment below ^^

Sunday, June 30, 2013

Crayon Melting Art

Pew! Pew Pew!

Materials:
Poster paper
Rainbow of crayons
Scissors
Pencil
Hair dryer with high heat setting
Hot glue gun & sticks
Nail polish*


*optional, I was experimenting on different media and wanted to try it instead of the usual acrylic paints

Sketch on black paper.


Cut out piece of poster to glue the crayons to and protect (most) of the hand form crayon wax.

Peel off the paper....

Scandalous! Naked crayons???
Don't judge me... It doesn't have to be pretty.
Rough crayon melting.
Painted gun hand.
Painted shot hand.
Glad we had a heart to...'art. <3
-Otakute

Saturday, June 22, 2013

Huge Fluffy DIY Amigurumi *Hidden Container* Totoro (Free Crochet Pattern with step by step picture references)

What mine turned out like! :D I wrote the pattern as I went. Enjoy~
I was talking to my friend the other day and he reminded me of a pattern I started, but never finished. As if in a mad trance, I attacked my pile of yarns, digging through the felt, and thread, and rubbish. The texture of crinkling plastic was within my reach. Inside, a forlorn grey circle spanning 25 single crochet increases. I lost the paper I wrote the pattern on and so I reluctantly unraveled the yarn into a ball. This is the result of hours of crocheting. (I worked on and off from May 26 to June 20- almost an entire month! -3-)
*My totoro is quite large, hence Huge in the title. This is a project for intermediate/experieced diynosaurs; I won't explain things such as the Magic Circle, the type of sewing techniques used, or abbreviations. (Mostly because I don't bother to learn them myself....) Though I have a slightly different way of writing out patterns....so.... Feel free to leave a comment if you're confuzzled, I'll be glad to help. ^u^ This also to corrections, comments, suggestions, snark remarks, questions, confessions, thoughts on life. (*see pictures for reference*)
*disclaimer: I know he's not perfect, but I still love him just the same. I'm not super awesome at crochet, (and I know for a fact that my sewing skills are extremely limited...I mean, just look at his belly marks XD) but its something I enjoy in my spare time. :3

I doubt anyone reads/will read this, but here's a free pattern for you, internet! *throws pattern at face*
I hope you enjoy the collection of ever-changing iPod picture lighting. :3

Materials:

Yarn- (4 rolls of grey, 1 white, and some black)
Yarn needles
A pair of black eye beads (Sewology, the brand I had, didn't show the size, but they look like 9mm)
Stuffing- 2-3 bags will do, I used two and its not nearly full, but will do since he's a container.
2 zippers (optional) -I used a white 22 inch zipper for the tummy and a grey 7 inch zipper for the back.
Humble beginnings. 

Body (grey):

*repeat 6x*
1) Magic Circle Ch 6
2) *inc*
3) *sc, inc*
4) *2 sc, inc*
5) *3 sc, inc*
6) *4 sc, inc*
7) *5 sc, inc*
8) *6 sc, inc*
9) *7 sc, inc*
10) *8 sc, inc*
11) *9 sc, inc*
12) *10 sc, inc*
13) *11 sc, inc*
14) *12 sc, inc*


A considerable amount of time later..


15) *13 sc, inc*
16) *14 sc, inc*
17) *15 sc, inc*
18) *16 sc, inc*
19) *17 sc, inc*
20) *18 sc, inc*
21) *19 sc, inc*
22) *20 sc, inc*
23) *21 sc, inc*
24) *22 sc, inc*
25) *23 sc, inc*
26) *24 sc, inc*
27) *25 sc, inc*
28) *26 sc, inc*
29) *27 sc, inc*
30) *28 sc, inc*
31) *29 sc, inc*
32) *30 sc, inc*
33) sc around *repeat 3x*
34) sc around (optional- Do NOT connect ends; at end of round, go around the opposite way. This creates a line down the middle to place the zipper. Scroll down for pictures if you're confused.) *repeat 40x*
I'm holding together the unattached ends;
the knot just shows where my
old yarn ended...
35) Attach zipper.
36) sc around *repeat 25x*
37) *30 sc, dec*
38) *29 sc, dec*
39) *28 sc, dec*
40) *27 sc, dec*
41) *26 sc, dec*
42) *25 sc, dec*
43) *24 sc, dec*
44) *23 sc, dec*
45) *22 sc, dec*
46) *21 sc, dec*
47) *20 sc, dec*
48) *19 sc, dec*
49) *18 sc, dec*
The sc arounds will cause his body to gradually take shape.
50) *17 sc, dec*
51) *16 sc, dec*
52) *15 sc, dec*
53) *14 sc, dec*
54) *13 sc, dec*
55) *12 sc, dec*
56) *11 sc, dec*
57) *10 sc, dec*
58) *9 sc, dec*
59) *8 sc, dec*
60) Attach legs, belly, arms, ears, and face. Stuff.
61) *7 sc, dec*
62) *6 sc, dec*
63) *5 sc, dec*
If you're confused on step 34... ^
64) *4 sc, dec*
65) *3 sc, dec*
66) *2 sc, dec*
67) *sc, dec*
68) *dec*
69) Zig zag remaining yarn through the circle/tiny opening and pull closed.


Ta-da! Now he's ready for zipper surgery...


As soon as the zipper was placed (I hand sewed it on) the sc arounds were
back to normal.
Almost there.....

Dat zipper. ^

Dat zipper ^ in daylight ;)
Anddd just tuck it inside.


For the inside of the zipper, I took a rectangle
cut of an old plain white t-shirt.

Legs (grey):

*repeat 6x*
1) Magic Circle Ch 6
2) *inc*
3) *sc, inc*
4) *2 sc, inc*
5) *3 sc, inc*
6) *4 sc, inc*
7) *5 sc, inc*
8) *6 sc, inc*
9) *7 sc, inc*
10) dec 13, sc around
11) inc per dec, sc around
12) sl st 27, sc 27
13) *sc around*

Arms (grey):

*repeat 6x*
1) Magic Circle Ch 6
2) *inc*
3) *sc, inc*
4) *2 sc, inc*
5) *3 sc, inc*
6) *4 sc, inc*
7) *5 sc, inc*
8) *6 sc, inc*
9) *7 sc, inc*
10) sc around *repeat 19x*
for the following, *repeat 3x*
11) sc 27, *7 sc, dec*
12) sc 27, *6 sc, dec*
13) sc 27, *5 sc, dec*
14) sc 27, *4 sc, dec*
15) sc 27, *3 sc, dec*
16) sc 27, *2 sc, dec*
17) sc 27, *sc, dec*
18) sc 27, *dec*
 
Ears (grey):

*repeat 6x*
1) Magic Circle Ch 6
2) *inc*
3) sc around *repeat 2x*
4) *sc, inc*
5) sc around 
6) *2 sc, inc*
7) sc around *repeat 2x*
8)  *3 sc, inc*
9) sc around *repeat 6x*
10) *4 sc, inc*
11) sc around *repeat 3x*
12) *4 sc, dec*
13) *3 sc, dec*
14) sc around *repeat 2x*

Tail:

*repeat 6x*
1) Magic Circle Ch 6
2) *inc*
3) sc around
4) *sc, inc*
5) sc around
6) *2 sc, inc*
7) sc around
8) *3 sc, inc*
9) sc around
10) *4 sc, inc*
11) sc around *repeat 8x*
12) *4 sc, dec*
13) sc around
14) *3 sc, dec*
15) sc around *repeat 3x*

Belly (white):

*repeat 6x*
1) Magic Circle Ch 6
2) *inc*
3) *sc, inc*
4) *2 sc, inc*
5) *3 sc, inc*
6) *4 sc, inc*
7) *5 sc, inc*
8) *6 sc, inc*
9) *7 sc, inc*
10) *8 sc, inc*
11) *9 sc, inc*
12) *10 sc, inc*
13) *11 sc, inc*
14) *12 sc, inc*
15) *13 sc, inc*
16) *14 sc, inc*
17) *15 sc, inc*
18) *16 sc, inc*
19) *17 sc, inc*
20) *18 sc, inc*
21) *19 sc, inc*
22) *20 sc, inc*
23) *21 sc, inc*
24) *22 sc, inc*
25) *23 sc, inc*
26) *24 sc, inc*
27) *25 sc, inc*
28) *26 sc, inc*
29) *27 sc, inc*
30) *28 sc, inc*
31) *29 sc, inc*
32) *30 sc, inc*
33) Using grey yarn, sew on arrow marks. *see picture for arrow marks*

Eyes (white):
1) Magic Circle Ch 12
2) inc half way around/six times
3) Attach black eye beads.

Claws (black):
For hands, there are five: two that are 3 Ch and three in the middle that are 4 Ch.


For the feet, there are three: two that are 3 Ch and one 4 Ch in the middle.

Nose (black yarn):
I just winged it...*shrugs* Its a tiny triangle.

Whiskers (black thread):
*shrugs again* They're just lines. 

Whiskers close up ;)


Totoro says thank you for your time :3 If you would be interested in a amigurumi pattern for Link of off The Legend of Zelda, do tell.
-Otakute

Sunday, April 28, 2013

DIY Boater Hat Tutorial (From Scratch)

Finished product!
Materials:

Twine
Hot Glue
Grosgrain ribbon (mine has 1 inch width)

All available at a local HobLob near you.

 Ready? Set? Do it yourself.

*Optional, but advised: create a rudimentary prototype out of paper. This will give you a rough idea on visuals.
1) Using a fairly large piece of paper, cut out a circle as desired. (I used a compass and my circle had a 5&1/4 in radius). From the large circle, cut out a smaller circle. (With the compass, my smaller circle had a 3& 3/4 in radius and my large circle had 1&1/4 in of paper all around.) This "large circle" will be the brim. The "small circle" will be the top of the hat.
2) With a long strip of paper, (mine was a 23x2&5/8 in) tape the top of the hat to the strip. Fold in about a half inch over the top of the hat, tape it down, and repeat for about every other inch. There will be odd folds in between because of the fact that it is a circle and the rectangular strip will not cohere to its circular ways. (Don't worry if it looks wonky, its just a pre-DIY to make sure you will have a hat that fits. It would be better to have to start over using paper than the twine, which is much more difficult to work with.) The end result should be a 2& 1/8 inch height.
3) All that's left now is to tape the brim and to cylinder.
4) Try it on. Too small? Add a half inch to all the lengths. Too large? Subtract a half inch. Play around with the measurements as you wish. This prototype will be a relatively accurate same-scale model.

Braided Twine

Braidin' La Twine

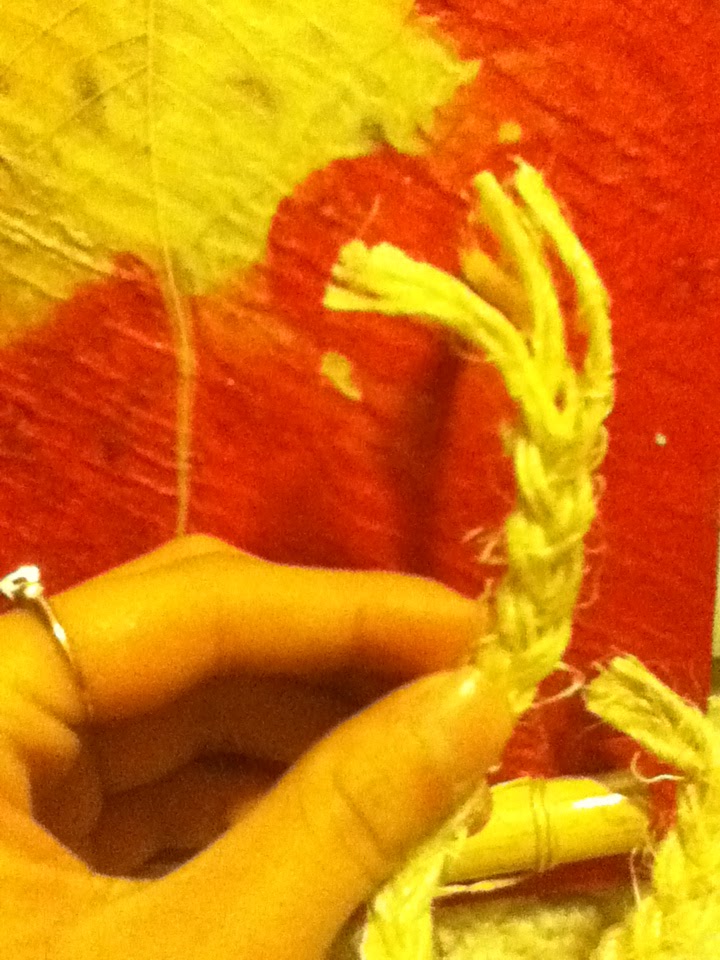
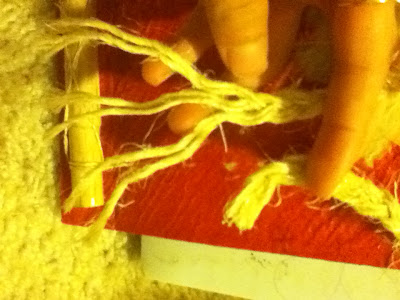
 1) Grab the twine and cut about 1 yard strands. One braid will require six strands; I found it much easier doubling up on the twine rather than using single strands for the braid-it speeds up the process.
2) Secure the six strands with a rubber band. Divide six strands into three, with two in each group.
3) Begin braiding. Make sure to fully separate each group as you braid; not separating will result in tangles in the the twine that will interfere with the hot glue process.
4) Finish the braid by putting as many braids in as possible, hold the end between your thumb and forefinger, and hot glue the end tip.
5) Repeat steps 1-4 for multiple braids. You will only need one braid to begin making the hat. Continue with the tutorial, then come back to this part when more braids are needed. The hat is a manipulation of the connected pieces of braid.


Top part of the hat


1) Take a piece of braided twine. Remove the rubber band. (You may need to re-braid a bit of the end where the rubber band held the twine in place). Hold it between your thumb and forefinger and add a little hot glue.
2) While making this part, keep in mind that the top of the hat will be flat. Find a flat surface safe to use hot glue on (I used our wood dining table; the hot glue peeled off quite easily). Place one end of the braid down and secure it with your finger. Hot glue one side of the braid to the end using as little glue possible, making sure to create as little space between twine as you can. Spiral around the oval-ish shape and continue gluing around. It will eventually form a circle shape. You may eventually run out of braid, which is fine. It took me, I believe, around three or four braids to produce a top with my desired diameter. Simply refer to the Braided Twine portion of the tutorial for more braids.
3) To attatch two braids together, you need to finish the one already on the and leave about a 2 inch tail. Hot glue the new braid and the tail of the current one.

*When gluing, keep the glue showing only on one side so that when you peel it off of the surface, there won't be as much glue showing.

Height of the hat
A stack of braids would look like such for the height. (This isn't attached because it was just an example)
1) With this, I used about four or five braids. Which ever side you want showing should be facing down. Glue a braid to the hat perpendicular to the way it was previously glued and on the circumference of the circle. This will start the height.
2) Keep the braids glued tight. When you reach the raised end of where the height started, push it down and in slightly. Glue around and above the raised end.
3)  Continue gluing around and adding braids as necessary.

Brim of the hat

1) Upon finishing the height, you can start to glue a brim. Begin by turning the hat over.
2) Then, take the current braid and flatten it against the surface.
3) Glue around the hat similar to the way the top part is made.
4) This part requires about four or five braids.
5) Finish it off by tucking in the end so that it is inconspicuous.

Ribbon

A boater hat isn't complete without the only decoration- ribbon! I made a little bow with mine.
Wrap it around the height and cut more than you think you need- you can always cut off excess.
I wrapped it around, made a bow, and left about 6 inches on both of the tails. I also added a tad of regular Elmer's glue to the ribbon and the height so it wouldn't slip off.


The twine is sorta pokey, but this allows it to stay on well.


Hope this was helpful. :3
-Otakute